it is an downsampling bitcrusher delay,the saw acts like Samplerate, nice effect...
Cpwitz Contributions
Don't have time to check it out tonight, but do you really mean major 7th? The 7th harmonic (if that's what you mean) is slightly flat of a minor 7th normally. Unless you're actually a lot higher up the spectrum than I realise and it is actually a harmonic that is closer to a major 7th.
Yes, it's a little flat major seventh: fundamentalHz*7.5
This gives for a A2 (110Hz) 825Hz.
Equally tempered the major 7th would be 830.61Hz. The tempered minor 7th would be 783.9Hz. Or did I miscalculate (happens very often)?
I wasn't thinking in tonewheel harmonics but wanted to have pure overtone factors. But it maybe really makes sense to make a tempered version of the sine overtone oscillator to act more like drawbars on hammonds.
Ah ok, so really it's the 15th harmonic of a fundamental an octave lower (the sub I guess).
patches/cpwitz/effects/mod-filter-array.axp
This is my humble attempt to recreate the famous Moog Midi MuRF pedal with Axoloti. As I discovered that this cool pedal isn't produced anymore (I think, they ran out of filter chips) I wanted to build something like this with axo. I'm using resonant factory svf bandpass filters, so you can't expect a true Moog sound recreation. But it can produce some freaky modulations especially on synth pads, guitar and drum sounds.
The patch is designed as a pedal-like effect and takes the sound input from audio in left. But you can easily repatch it to modulate Axoloti sound sources.
So, what can it do? It has 8 tuned filter bands, which are triggered by a 16 step pattern which is driven either by internal or MIDI clock. Each trigger impulse starts an ad-envelope for the triggered band with adjustable attack/decay time. The filter bank has two modes: Mids and bass band. If you turn on bass-bands, the filters are acting on lower frequencies.
These are the relevant objects/controls:
clock-source
random - Turn on to randomly trigger one of the 16 steps in the pattern. If off, the pattern runs sequentially.
internal/MIDI - Select either internal clock or MIDI clock
internal-speed - Speed of the internal clock lfo
MIDI clock div - Select the time division (resulting in note values) for the MIDI clock. There are comments to the right of the selection indicating the resulting note value.
pattern
The trigger pattern for the filter bands. Vertically you select the band which will be triggered in each of the 16 horizontal steps. The low frequency bands are on the top.
level dials
Dial in the trigger level of each band or to be more exact: the top-level of the envelope after attack. A level setting of 0 means, triggers for this band won't be heard. You can also use the levels to tame bands, that resonate to loud with the given input sound. The labels of the level dials show the center frequency of the band in mid/bass mode (see below: filterbank/bass-bands checkbox).
env-attack/env-decay
The trigger envelope attack and delay time for all bands. Here you can define the overall feel of the pattern (staccato, fluid or backwards-like).
resonance
The filter resonance level for all bands. Be careful with high values (your speakers or ears might get damaged).
lfo-speed/lfo-depth
You can add a sine lfo to sweep the filter frequency of the bands. Gives a chorusy quality to the effect.
stereo-width
If you turn up the stereo width the odd numbered filters are panned to the left and the even numbered filters to the right output.
inputlevel - does what it says
distort-input checkbox
Turn on to soft-saturate the input signal. Gives a warmer quality to the sound.
filterbank/bass-bands checkbox
With this checkbox on, the filter's frequencies are pushed more to the bass range. Good for bass sounds. The first filter isn't a bandpass anymore then, but turns into a lowpass at 110Hz (like in the original pedal). The band frequencies are displayed in the labels of the level dials.
dry/wet-blender
The last setting is for blending the input signal with the effect signal.
I had lots of fun with the sounds you can get out of this. LittlePhatty leads, drum synths or thick pads are gorgeous. And even more fun, if you pass the effect through further delays or reverbs.
patches/cpwitz/effects/grain/grain-mill.axp
Grain-mill is a granular delay/destroyer with variable grain playback position, variable grain size and envelope, optional MIDI sync and a freezable buffer. It's designed as a send or insert effect and therefore takes the input from audio in left. I also made a version working with the AxoControl board for a handy stand-alone effect (see below).
Here are the controls:
midi-sync
Turns on MIDI clock synchronisation. If it is turned on, it waits for MIDI clock pulses. Caution: As long as no MIDI clock comes in, the internal-speed is used. When a MIDI clock is received, triggering is synced to the clock at the selected note value divisions (see below).
random
When turned on, triggers are sent randomly (about 50% probability). Syncs to MIDI, too.
freeze
This toggle freezes the recording buffer, meaning that no incoming audio is processed, but the same buffer is granulised over and over.
clock-source/internal-speed
Sets the grain trigger speed when not MIDI synced.
clock-source/MIDI clock div
For MIDI syncing you can select the desired note value for grains to be triggered. The labels to the right of the radio buttons show the resulting note value.
The red LED is blinking every time a grain is triggered.
Motion
Motion is the movement of the position a grain is taken from the recording buffer every time a grain is triggered. With the motion controls you can build some kind of reverse or speed-up/slow-down effects.
motion-speed
Sets the LFO speed of the selected motion.
motion-amount
Sets the amount of the motion within the recording buffer. 0 means no motion at all (weird sound) and 64 moves through the whole buffer.
motion-type
You can select one of four motion types:
- "Saw down" is moving backwards through the recording buffer starting at the oldest sample and moving back to the newest. Good for reverse-like effects.
- "Saw up" moves from the newest to the oldest samples and can create some kind of speed-up or slow-down effect.
- "Triangle" is moving back and forth.
- And finally "random" takes every grain from a random position.
These settings are very much fun to experiment with spoken audio inputs or music.
grain-size
The size of a grain. Can go from very long to nasty short snippets of the incoming audio. A grain snippet is looped as long as the envelope for a grain is active.
grain-attack/grain-decay
The attack/decay volume envelope for a grain. Longer attack and shorter decay for a reverse-like effect. Short attack and long decay for delay mayhem. And no attack and short decay for decent stuttering.
feedback
Sets the feedback amount of grains back into the recording buffer. Lots of feedback with a long decay setting can lead to infinite feedback noise. Beware: If the recording buffer is freezed, feedback doesn't have an effect.
stereo-width
With stereo-width turned up, each grain is output alternately to the left and right stereo channel.
dry-level
With this dial you can mix in the incoming live signal to the output (e.g. if you use it as insert effect device).
Recording (delay) buffer size
The patch has a table/alloc object "buffertable", which defines the recording buffer's size. You can play with the size setting to make the overall delay shorter or longer.
patches/cpwitz/effects/grain/grain-mill-axocontrol.axp
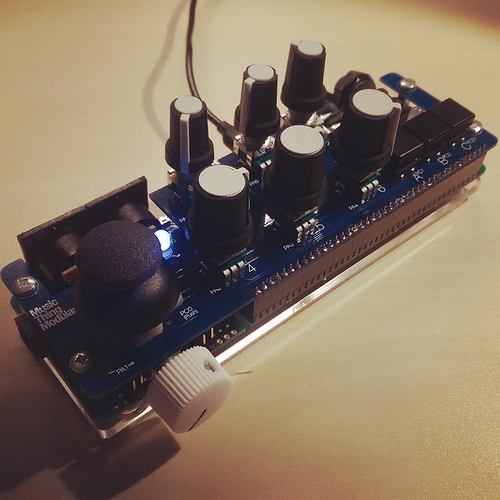
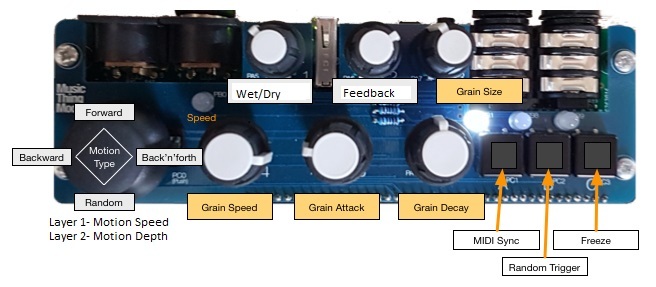
This is the version of grain-mill working with the AxoControl pot-PCB. The controls are mapped like this: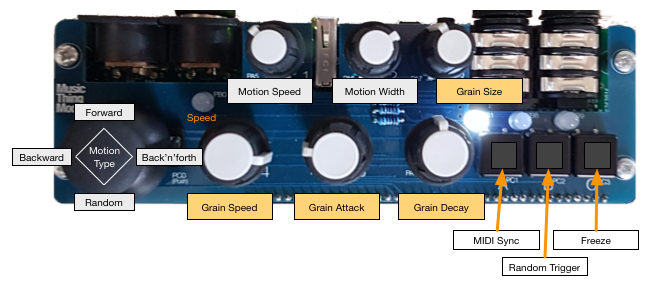
Feedback and stereo-width can't be controlled with the AxoControl. You can hook up for example MIDI CC numbers to control them.
Hope you like it! Feedback (even in grains) welcome! 
Radiohead-esque Glitch Patch?
Oh nice! Will use this to demo the Axocontrol this weekend at the Brighton Modular Meet I think 
@Thonk Also check the controller subpatch that I have created for Axocontrol. This is not really apatch that makes any sound, but it can be copied to any patch to use Axo control for the patch. It has got layers, so all knobs can be used twice, giving 12 knobs, 2 joysticks etc.
@cpwitz Maybe you can use the subpatch to give your patch some extra functions? I would suggest using the midi CC version cause it take minimal amount of setting up. Just assign what you want to control to a the midi cc number in the patch (1-16) and control away 
Hey, first time posting so i'm new to the forum and to Axoloti.
Apologies if this is in the wrong place.
I got a board a couple of months back and have been playing around with some patches and used it in a couple of gigs - I love it! feels like something i've been waiting for without even realising!
This particular patch looks fantastic - I'd like to give it a try alongside some feedback stuff i'm working on.
So far i've not been able to as when I open the patch it there's a messages that the Grain player object is missing (it isn't, I can see it when I go looking via finder)- any ideas? (pleaseandthanks)
Strange. I tested it with macos and windows and it opens without complains. Which version of the Axoloti software are you using? Latest 1.0.10?
Yeah, I updated to 1.0.10 before trying... I am on an older Mac OS tho' (10.7.5) which I guess might have something to do with it?
have you done a 'sync libraries' since you upgraded?
if still have something, post in the helpdesk category, including details of your setup, and also a copy of what is being reported in the console, during startup and also when you attempt to run the patch.
Yeah, I really like your layered controller approach and already experimented with it!
But IMHO it's a bit complex switching layers and indicating the user which layer is active with the given LEDs. For example in a performance situation this could lead to frustration... especially if I am this poor user 'cause I can't remember what buttons I pressed 20 seconds ago  . I rather like "one knob per function" interfaces.
One idea comes to mind: A shift button! Using the joystick button as a shift button (maybe indicated by flashing LEDs) and as long it is pressed, the knobs change their function (feedback and stereo in this case). What do you think about that?
Thanks so much! - Through the comments made here I found out what was going wrong and it was a dumb mistake on my part, due to having too many copies of patches stored in different places whilst rushing to get something working.
I now have @cpwtiz's grain mill running with the input being triggered feedback loops. Fun stuff!
I love the grain-mill patch too. Will attempt to get it running off a Behringer BCR2000 soon (alongside aforementioned feedback).
Thanks again!
cpwitz/midi/arpeggiator.axo
A simple'n'easy-to-use MIDI arpeggiator. It features
- 5 arpeggio directions: Up, down, up/down, random and play order
- Up to 3 additional octaves
- Adjustable note length with modulation inlet
- Fixed velocity setting or using incoming trigger-note's velocity
- "Hold" inlet to latch the arpeggio notes (a MIDI sustain pedal message also sets "hold")
- Semitone transpose inlet
You need a clock source to trigger the arpeggiated notes. This can be either a square LFO, a (divided to note values, if u like) MIDI clock input or a trigger sequencer.
With the pitch, velocity and gate outlets you can control your oscillators, envelopes or more complex sound sources.
If you want to send the arpeggio to another MIDI device, you can employ a factory "midi/out/note" object.
These are the controls: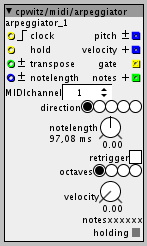
MIDIchannel: Selects the MIDIchannel the arpeggiator is listening on. Caution: It listens on all MIDI devices. I was too lazy to make a device selection (please insist, if it's really needed).
direction: (from left to right) up, down, up/down, random, play order.
notelength: sets how long the gate out is held
octaves: adds up to 3 octaves to the arpeggio range
velocity: Set a fixed output velocity. Value 0 means, the velocity of the incoming trigger note is used
The arpeggiator has two displays on the bottom: showing the number of notes, the arpeggio consists of, and an indicator, showing if the arpeggio is held.
Updated:
- The notelength can be externally modulated with the notelength inlet
- The "notes outlet" outputs the number of notes as integer value
- retrigger parameter: When the notelength is longer than the clock interval, this checkbox sets retriggering of the gate every time a new arpeggio note is played. Especially good, if you send the arpeggio to other MIDI devices and don't want to lose note triggers.
P.S.: Imagine multiiple arpeggiators in one patch, triggered with different clock divisions and set to alternate directions, octaves and pan positions of their sound generators... I just had fun 
i start to get a little lost if there are too many layers of knobs going on. there is still one more analog input available at PC4 and you can fit a 9mm right angle pot beneath the joystick. i added a knob that seems to work well as a thumb dial.
so as cpwitz suggested i used the joystick button but limited it to only one knob to share motion speed and depth. the joystick's button shift layer activates the depth setting; that way you can scrub in and out motion depth with joystick button clicks. the speed is always active (doesn't do anything if the depth is scrubbed in at a 0 setting.
cpwitz/midi/paraphonic.axo
It's quite a hype nowadays for every hardware synthesizer with more than one oscillator, to have a "duophonic/paraphonic" play mode to get something like polyphony even if there's only one filter and vca. I'm not criticising, because this offers really some interesting new playing styles.
So here it is: A "4 notes paraphonic" (quadrophonic?) MIDI input object for Axoloti.
DISCLAIMER: "Paraphonic" does not mean "polyphonic". If you intend do build a real polyphonic patch, use the recommended "polyphonic subpatch" approach!
This object is designed to build a so-called "paraphonic" synthesizer voice.
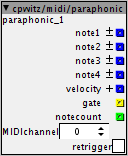
The outlets note1-4 deliver the notes of up to four pressed keys. If only one key is pressed, all note outlets send the same note unisono. Up to three additionally pressed keys are distributed over the note1-4 outlets. More keys than four are simply ignored.
The gate outlet is high as long as any key is pressed. The "retrigger" checkbox turns on retriggering of the gate outlet with every additional keystroke.
The velocity outlet delivers the velocity of the first hit key.
The MIDI input channel is independent from the patches settings, just set the MIDIchannel attribute to the desired input channel. Channel 0 means "listen on all channels".
If you just want to make a "duophonic" voice (2 oscillator) or "triphonic" (3 oscillators) just connect only note1-2 or note1-3 and leave the remaining notes unconnected.
There's a demo patch, a 4 oscillator paraphonic fm synth with really low cpu load and funny sound: patches/cpwitz/synths/fmsynth-paraphonic.axp
Vintage Synths & Web-MIDI Controller interface
IMHO the signal flow of vintage premium synths is at least as inspiring as their actual sound. I started to test this theory with rebuilding two classics with Axoloti: A Juno-106 and an ARP Odyssey. I didn't expect (neither should you) that the real-and-true-and-only sound can be reproduced with existing Axo objects. But the spirit of an old vintage machine can be approached, I think.
So here they are in the community library as patches:
patches/cpwitz/synths/webmidi/oddly.axp
An approach to an Odyssey. Two routing limitations exist: The filter is not audio-rate modifiable with the sample&hold mixer, and the osc2 sync doesn't work with pulse wave (when synced, it's always playing a plain square wave). Thanks to @johannes for his 24db lowpass filter jt/filter/vcf4pole. This patch is 2-voice paraphonic.
patches/cpwitz/synths/webmidi/junebug.axp
My attempt to recreate a Juno-106. Pretty damn close, I think. It's 6-voice polyphonic. Here the stereo chorus from @DrJustice is a pretty important part: drj/fx/stereo_chorus.
Web-MIDI Controller
You might ask: Why are these synths in a "webmidi" folder?
When fiddeling with sounds I find the well-loved Axoloti Patcher interface a bit too distractingly fiddly. And therefore I built a little HTML/JavaScript application which allows a more sexy and focused interface for handling synth parameters via MIDI CC. For several years now, the Chrome browser offers a JavaScript Web-MIDI API which I was longing to use for something for a long time.
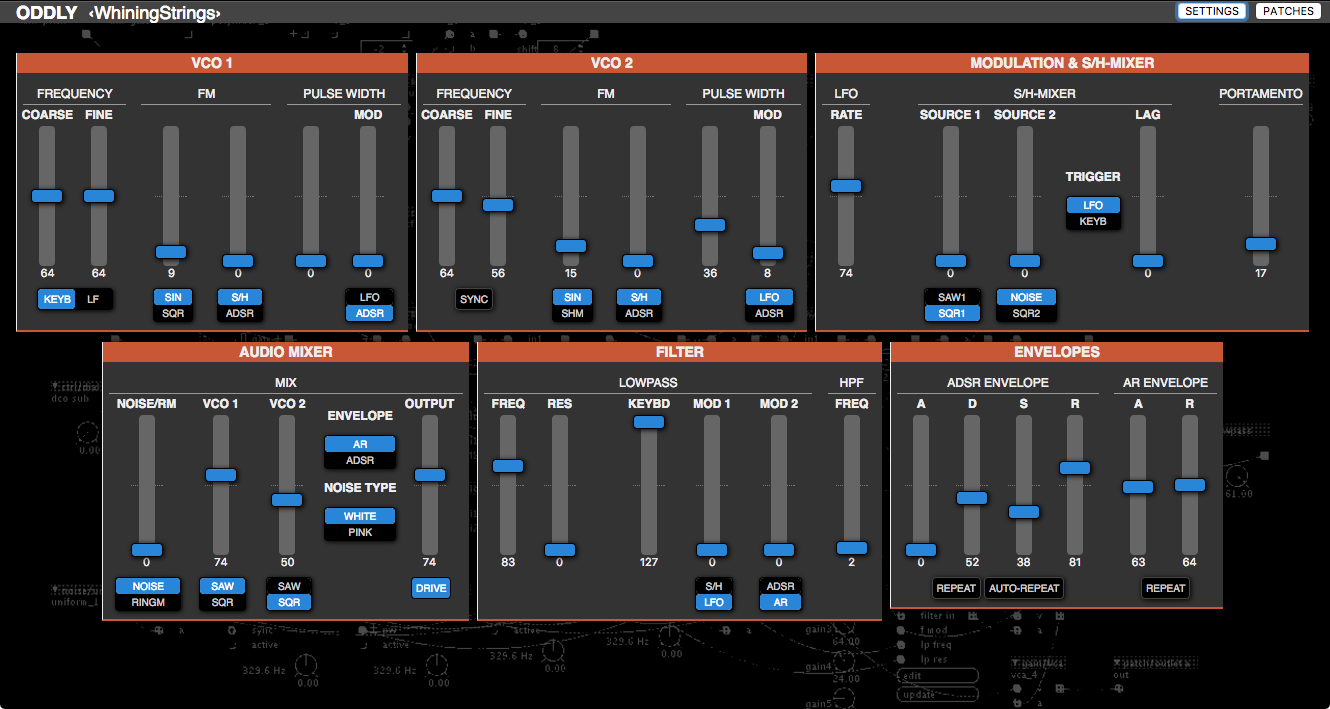
Here's what you need to do, to use it:
- Install a Google Chrome Browser
- Download the webmidicontroller.zip from GitHub
- Unpack the ZIP file
- Start one of the mentioned Axo patches on your Axoloti
- Open the corresponding HTML file from the extracted ZIP content with Chrome (either drag'n'drop the HTML onto the Chrome Application or right-click and choose "open with...")
- Press the "Settings" button on the web page in Chrome and select your Axoloti for "MIDI out". Depending on your setup you can either use the "Axoloti Core" device (the directly to the computer connected Axoloti) or the MIDI device, where your Axoloti is attached to.
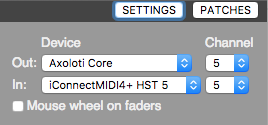
- Select the correct MIDI channel for each patch. Due to my MIDI setup the patches are configured like this:
oddly.axp is on channel 5,
junebug.axp is on channel 4 and the
formantor.axp is on channel 14. - If you have a MIDI controller keyboard you can configure it as "MIDI in" in the settings dialog and the changes you make with your controller keyboard are displayed on the Chrome page. Of course your controller keyboard needs to be configured to use the corresponding MIDI CC numbers. The MIDI CC numbers of each control on the interface are shown as mouse-over tooltip.
- Press the "Settings" button again to close the settings window.
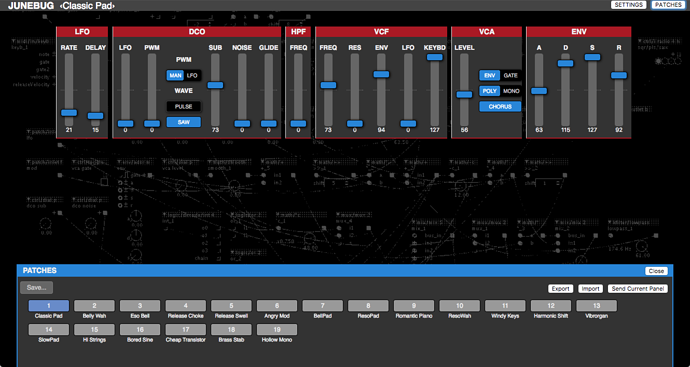
This is the JUNEBUG controller with the patches dialog opened.
Each controller page can store up to 128 patches and comes with a bunch of presets that I fumbled together. The interface should be quite self-explanatory. Just press the "Patches" button.
I also added my formant-synthesizer to be controlled with such a web-interface. The patch is in patches/cpwitz/synths/webmidi/formantor.axp and the HTML page from the ZIP is called formantor.html.
You can use this HTML/JavaScript to build your own controller interfaces for your patches or even real synths. With some basic HTML-knowledge you can make your own controller pages, sending whatever CC-values you like. There is a file called xx-template.html and if you open it with your favorite HTML editor (or on GitHub) you'll find comments inside the mark-up explaining, what you can do. Just copy the xx-template.html to a new file and make the appropriate changes to it.
That's it, tell me what you think about it!
Peter
P.S.: By the way - this web-application works completely offline and does not call any remote URLs or sends any data to any server in the world!
trying to upload your patch I get the following error
Saving preferences...
preferences path : C:\Users\Mauro\Documents\axoloti\axoloti.prefs
java.lang.ClassNotFoundException: is-copy-enabled is-u2f-enabled
java.lang.ClassNotFoundException: is-copy-enabled is-u2f-enabled
at java.net.URLClassLoader.findClass(URLClassLoader.java:381)
at java.lang.ClassLoader.loadClass(ClassLoader.java:424)
at sun.misc.Launcher$AppClassLoader.loadClass(Launcher.java:331)
at java.lang.ClassLoader.loadClass(ClassLoader.java:357)
at org.simpleframework.xml.strategy.Loader.load(Loader.java:50)
at org.simpleframework.xml.strategy.TreeStrategy.readValue(TreeStrategy.java:163)
at org.simpleframework.xml.strategy.TreeStrategy.read(TreeStrategy.java:102)
at org.simpleframework.xml.convert.AnnotationStrategy.read(AnnotationStrategy.java:100)
at org.simpleframework.xml.core.Source.getOverride(Source.java:360)
at org.simpleframework.xml.core.Factory.getConversion(Factory.java:207)
at org.simpleframework.xml.core.Factory.getOverride(Factory.java:139)
at org.simpleframework.xml.core.ObjectFactory.getInstance(ObjectFactory.java:63)
at org.simpleframework.xml.core.Composite.read(Composite.java:139)
at org.simpleframework.xml.core.Traverser.read(Traverser.java:92)
at org.simpleframework.xml.core.Persister.read(Persister.java:625)
at org.simpleframework.xml.core.Persister.read(Persister.java:606)
at org.simpleframework.xml.core.Persister.read(Persister.java:584)
at org.simpleframework.xml.core.Persister.read(Persister.java:543)
at org.simpleframework.xml.core.Persister.read(Persister.java:521)
at org.simpleframework.xml.core.Persister.read(Persister.java:426)
at axoloti.PatchGUI.OpenPatchInvisible(PatchGUI.java:1003)
at axoloti.PatchGUI.OpenPatch(PatchGUI.java:1025)
at axoloti.FileUtils.Open(FileUtils.java:166)
at axoloti.menus.FileMenu.jMenuOpenActionPerformed(FileMenu.java:255)
at axoloti.menus.FileMenu.access$200(FileMenu.java:51)
at axoloti.menus.FileMenu$3.actionPerformed(FileMenu.java:107)
at javax.swing.AbstractButton.fireActionPerformed(AbstractButton.java:2022)
at javax.swing.AbstractButton$Handler.actionPerformed(AbstractButton.java:2348)
at javax.swing.DefaultButtonModel.fireActionPerformed(DefaultButtonModel.java:402)
at javax.swing.DefaultButtonModel.setPressed(DefaultButtonModel.java:259)
at javax.swing.AbstractButton.doClick(AbstractButton.java:376)
at javax.swing.plaf.basic.BasicMenuItemUI.doClick(BasicMenuItemUI.java:833)
at javax.swing.plaf.basic.BasicMenuItemUI$Handler.mouseReleased(BasicMenuItemUI.java:877)
at java.awt.Component.processMouseEvent(Component.java:6535)
at javax.swing.JComponent.processMouseEvent(JComponent.java:3324)
at java.awt.Component.processEvent(Component.java:6300)
at java.awt.Container.processEvent(Container.java:2236)
at java.awt.Component.dispatchEventImpl(Component.java:4891)
at java.awt.Container.dispatchEventImpl(Container.java:2294)
at java.awt.Component.dispatchEvent(Component.java:4713)
at java.awt.LightweightDispatcher.retargetMouseEvent(Container.java:4888)
at java.awt.LightweightDispatcher.processMouseEvent(Container.java:4525)
at java.awt.LightweightDispatcher.dispatchEvent(Container.java:4466)
at java.awt.Container.dispatchEventImpl(Container.java:2280)
at java.awt.Window.dispatchEventImpl(Window.java:2750)
at java.awt.Component.dispatchEvent(Component.java:4713)
at java.awt.EventQueue.dispatchEventImpl(EventQueue.java:758)
at java.awt.EventQueue.access$500(EventQueue.java:97)
at java.awt.EventQueue$3.run(EventQueue.java:709)
at java.awt.EventQueue$3.run(EventQueue.java:703)
at java.security.AccessController.doPrivileged(Native Method)
at java.security.ProtectionDomain$JavaSecurityAccessImpl.doIntersectionPrivilege(ProtectionDomain.java:76)
at java.security.ProtectionDomain$JavaSecurityAccessImpl.doIntersectionPrivilege(ProtectionDomain.java:86)
at java.awt.EventQueue$4.run(EventQueue.java:731)
at java.awt.EventQueue$4.run(EventQueue.java:729)
at java.security.AccessController.doPrivileged(Native Method)
at java.security.ProtectionDomain$JavaSecurityAccessImpl.doIntersectionPrivilege(ProtectionDomain.java:76)
at java.awt.EventQueue.dispatchEvent(EventQueue.java:728)
at java.awt.EventDispatchThread.pumpOneEventForFilters(EventDispatchThread.java:201)
at java.awt.EventDispatchThread.pumpEventsForFilter(EventDispatchThread.java:116)
at java.awt.EventDispatchThread.pumpEventsForHierarchy(EventDispatchThread.java:105)
at java.awt.EventDispatchThread.pumpEvents(EventDispatchThread.java:101)
at java.awt.EventDispatchThread.pumpEvents(EventDispatchThread.java:93)
at java.awt.EventDispatchThread.run(EventDispatchThread.java:82)


