Tutorial: How to change program on Axoloti from external controller!


#1

Hey guys..

I just got around to changing presets on axoloti last night and thought Id share. I managed to get it working, but it took a few hours though...

I tried many times first using the controller object.. But that doesnt seems to work here or else I am doing something wrong. And my friend have not been able to make the controller object work either. Great idea, just no luck yet....

I tried using controller object for two different things, but it hasnt worked for me in any of those situations. I tried using it for routing the input of axoloti to the output.. That didnt work. Next thing i tried was the pgr change thing and I am not having any luck with this either. a tutorial, maybe in step form, on how to use it would be really awesome...

Anyway.. here is my experience. Tutorial is in the picture and also in the tutorial patch itself. Please let me know your experiences and if you got the controller object to work:

Patch
PgrChangeTutorial.axp (4.9 KB)

TUTORIAL:

ADDITIONAL:
Also in addition to this, I noticed that you can ONLY change between the patches that is actually saved on the card.. If you for example only have saved patches on 000-005, changing to patch 006, will have the effect that you cannot go back to 000-005, with out "unlive" and "Live" again. A solution could be to make a logic counter that ONLY count 000-005 or make some blanc patchfiles with ONLY the loading mechanism inside.. Then you can change away form them again.... THe problem is whenyou ge to a patch WITHOUT the loading mechanism.. then it wont work...

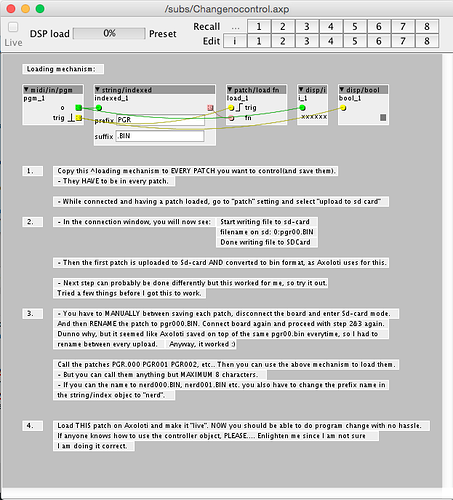
How to use controller object?
Using controller object to switch patches
#2

so still not working?

ok, I'll see if I can get some time, and use these as a basis to show how its done,
I think a video is whats needed.

one thing this highlights, is I think it would be a good idea for us to automatically name the bin file after the patch...
@johannes should not be too difficult and in line with some of the other things in progress.


#3

That is what I am saying.. I might be doing it wrong... but i know a friend has exactly same issue as me.. as soon as he tried making hte patch "live" in regular fashion, without comtroller object.. it worked.. and the same for me here..

But a crystal clear tutorial would be uber awesome. That would eliminate all the variables that dont work.....

if you are on Mac.. just use Quicktime record screen function. That works really well.. No audio, though.... But sometimes when you have to write somethig down and post it here.. there are steps lost.. much easier jus to post the screen recording..IMO...


#4

@thetechnobear

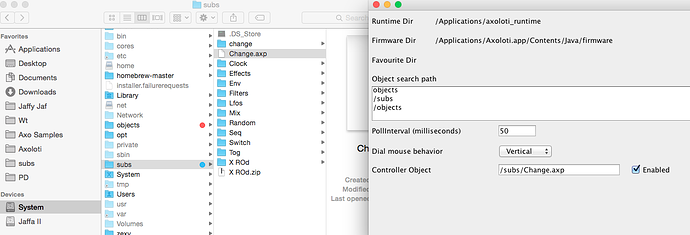
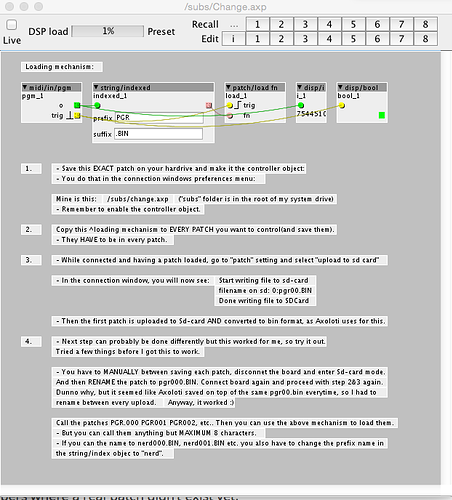
Here is the tutorial I made first which was based on the controller object. And a picture of the reference to the controlle object and where it is located on my hard drive.

First step does not work here.

t

Picture of controller object location and reference:

ic


#5

Im not really sure what your missing, I'll take a look... I'm sure its something small :smile:


#6

Thanks mate... I followed all the step i found in here..

I was wondering if it possible to do the step 4 in a different manner.. or do I really have to do the naming step manually and diconnect axoloti and change the name between each save?

, yes sure would be nice if it just named next 001, 002, 003, .... it uses only 00.BIN, not 3 zeros as axoloti uses for other indexing, for the string/index for example.


#7

Johannes has a better idea for program changes generally, that may be included in the firmware. but I'll still show this, as using controller objects is more a general purpose use-case, its not specifically for this.


#8

Yeah please, show this if it helps :smile:

But what is your experience? have you managed to get the controller object working? And in which scenario?


#9

ok, Ive found the issue...

it looks like another change has been made, that means it operates a bit differently now from how it used to work, and how I described it... I will update the other thread.

now it works by explicitly loading as an object from the object path, and you cannot give it an explicit path.

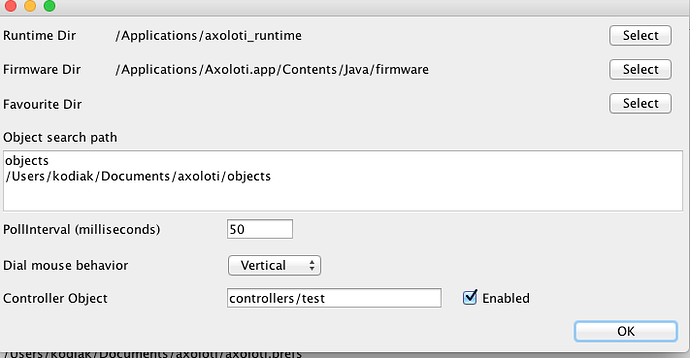
so you can see Ive added /Users/kodiak/Documents/axoloti/objects to my search patch
I then have saved my controller object in
/Users/kodiak/Documents/axoloti/objects/controllers/test.axs

what seems to have changed is that we can now no longer load objects with fully qualified path names,
at this stage I'm not sure if this is a bug or not, but for the next release this is all changing anyway,
so im not going to 'loose sleep over it'

sorry, I didnt test it earlier, but not been using them since I got a Push 2, so hadn't noticed it had stopped working the way I had originally done it.


#10

No problem :smile: Thanks for claifying it. Soo.... Create a folder and save ONLY the controller object inside that folder and refer to the folder not the patch itself. CHECK :smile:

Will see what happens down the road regarding the program change.. I dont really use it yet, but I have a friend who wants to use axoloti as part of his live set next weekend, so I promised to help him figure it out. And he got it working, so all good here :smile:

And thanks for the pic.. This helps a lot :smile:


#11

I've updated this post, with explicit instructions

the main thing, is it has to be on the object search path, and the the 'controller object' preference is referring to an object rather than a file.

on reflection, I probably changed this later on in development, as for the Push i developed a custom axo so probably when I did that I moved away from a subpatch to a 'fully fledged' object loading, knowing I could still use AXS files if it was required to be done in 'patching language' this will actually work very nicely with the new 'user library' functionality.


#12

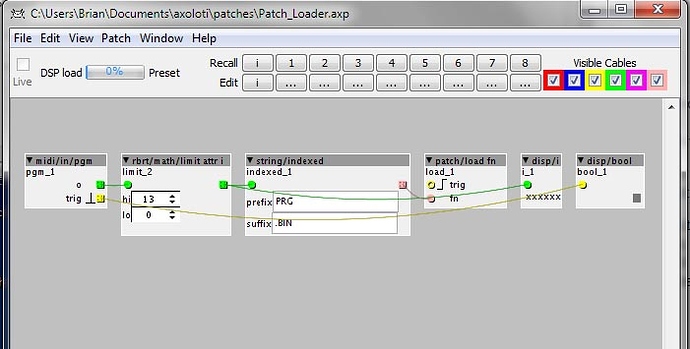
Old thread, but it came in handy for me this evening and I have something to add: A small enhancement to the program loader using a 'limit' object which avoids attempts at loading a non-existent patch if the program number exceeds the number of saved patches.


#13

Could this work with an analog control (I'm using an axocontrol board)?
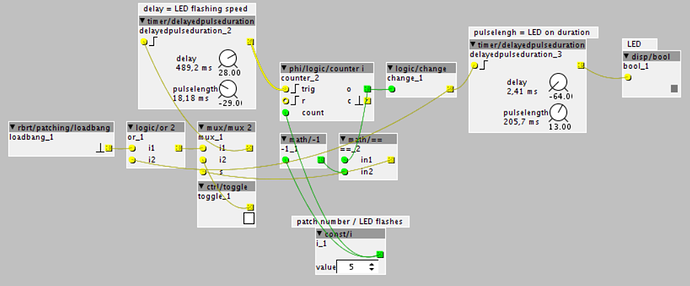
The idea would be to use one of the switch to go through all patches, and to use the dedicated LED to blink according to patch number. for example when patch 1 is loaded the LED blinks one time, patch 2, twice and so on. Would this work?


#14

I want to do this too but find the whole patch management scheme baffling to say the least.


#15

If you don't want to mess with strings and paths you could use a patch bank (in the patcher: File > New patch bank > Add patches in the order you want them > press Upload patch bank to save it to the axoloti). Then place a "patch/load i" object in all of your patches and connect a "const/i" object selecting the next patch to be loaded and the trigger signal from your gpio button. If you need back and forth try patching something with a "mux/mux 2" object with integer inlets.

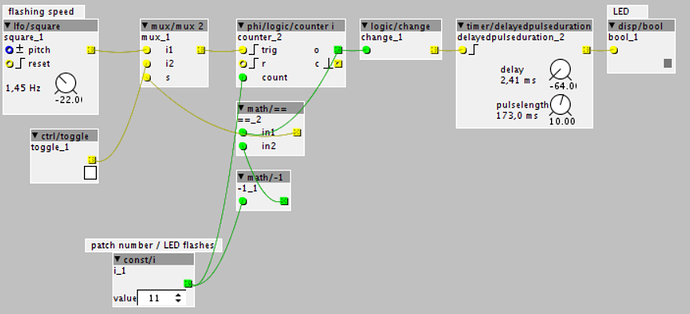
The LED indicating the patch number should be easy, but I can't figure it out somehow. Here's as far as I got:

There seems to be an offset or so, most of the time it flashes one time less than it should.


#16

Ok now I have a better solution for the LED thing.

LEDflash.axp (4.1 KB)


#17

thanks I'm gonna look into that.


#18

I found a way to change patches but it is very different to patch banks, but I think it is easier, but may require a little more in the setup.

Basically you have a patch just for loading other patches, a kind of master patch, but you will need to setup a trigger for every patch you want to load. But when you are done with the patch, you only need to have one object setup to return back to the master patch and the same object can be used for every other patch you intend to run.

This way you can have different master patches, and and remove patch names as required. But as said in the beginning, it is a little more work. But I like it because it feels like I have a little more control over my setup.

:grinning:


#19

Thats interesting!
Could you share a patch with the explanación? I think that many axoloti users could be interested.
Patch changing its quite frustrating for begginers


#20

OK I have tried this about 50 times.. no matter what I do I can't seem to get the following step to work..
In the connection window you will now see
start writing file to sd-card
filename on sd o:pgr00.BIN
Done writing to SD card.

All I see is :
N
Done compiling patch
Creating directory on sdcard : /NameOfMyPatch
Done creating directory
Start uploading file to sdcard : /NameOfMyPatch/patch.bin
uploading: /NameOfMyPatch/patch.bin
uploading : 100%
Done uploading file

.. what am I doing wrong ?