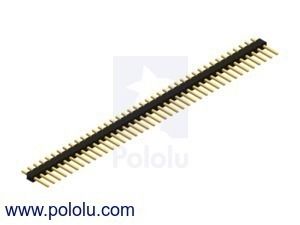
GPIO Dupontification for newbies


#1

I recently got a single-row 40-pin male Dupont connector set similar to this.

The objective, obviously, being to break out the GPIOs without having to solder everything in place manually.

How do you fine folks go about securing the 40-pin bar? It fits very loosely/non-tightly into the row of females.

This is my first foray into the world of crimp-connectors.


#2

I soldered mine into the Axo female holes. That way I have a proper female header to use instead of the Axo PCB holes for jumper wires etc.


#3

The reason that there is no male or female header soldered on in production is that there are different useful options: male header, female header, screw terminals. Soldering these is pretty easy if you're a little familiar with a soldering iron, while desoldering is far more difficult.


#4

I second that. I've lost count of the number of times I've damaged PCBs attempting to desolder something, so it's best to put some serious thought into what connector type you want to use, before picking up the soldering iron.

a|x


#5

Maybe I understand the question wrong, but are you talking about a connector like this one?


In that case, it is designed to be soldered onto the axoloti. The other parts in the box you show can then be attached to cable ends (you have to crimp on one of the metal pieces to each wire, and then push them into a plastic holder with the desired number of holes), and plugged onto the pin header you just soldered to axoloti.


#6

Thank you everybody!

Aye, that's the piece I'm talking about. I was just curious if there could be some solder-less way of securing it to the Axo. There is not, and that's fine. Once in place, it opens up the desired galaxy of (re)patchability.

I take it you need to solder each of the 40 pins, right?


#7

Yes, you should solder all of them. If the axoloti doesn't have exactly 40 holes, or you want to use only a section of the GPIO, you can also break it to smaller pieces and solder those separately. Usually there are grooves to make it easy to break at the right spot.

I've heard of a solderless version of this header, that would clamp in, but I've also heard it doesn't always connect nicely. So I recommend the soldering!


#8

I soldered the male header pin to axoloti with success. I had to break the header pin to small parts because it wouldnt fit otherwise. Everything seems to wlrk fine with the jumper cables. Now Im wondering how to connect the final connections to header pins. Solder a wire to them? Heatshrink jumpers to them?


#9

You definitely shouldn't solder direct to the pin headers. You need female header connectors.

https://www.amazon.co.uk/d/Audio-Video-Cables/SODIAL-Female-Solderless-Flexible-Breadboard/B00HUH9GOC would be an easy way to hook up to them.

If you want to do your own, you can get an assortment of crimp connectors from the usual electronic component suppliers, but you will need the appropriate crimping pliers.


#10

I have those cables. It just that they dont fit very tight. How do i secure/tighten them to stick the header pins better?


#11

The individual ones won't stick very tight. As soon as you move up to 2 or more pin female connectors, they tend to become much more stable.


#12

So its okay to use them for final connections if they feel tight enough? It would be nice because then it would be possible to easily change connections later if needed. I wonder if i can pair the female connectors myself so theyd be tighter on the header pins...


#13

If you are willing to super glue some of your single female connectors together in a row, then that will work. But whatever you do, don't glue them while connected to the axo, you may accidently glue them to the axo board. ! :grin:


#14

Supergluing helps a bit to get the female connectors to stay on the pins. I think I have made my enclosure a bit too small for the female connectors to fit. They get stuck on my potentiometers when I try to push the microchip inside the box. Is there any way to attach female connectors to pins so that they are more in a horizontal position than vertical. I was thinking about drilling small holes to their sides and push the pins thru the holes. I wish I wasn't in this situation but what's done is done. I guess Im Just gonna have try all kinds of tricks to get this done


#15

Do you have room to bend down horizontaly the male pins ? the only down side is to ensure you have enough room to push on the female plugs.
Can get a bit fiddly, if you have the plastic base on the male pins on top of the Axo circuit board, you can carefully pry it off allowing the pins to be bent right down againts the PCB. :wink:


#16

Yea, that sounds like a good idea to try. Thanks!