Gavin Contributions


#1

Forum profile : @Gavin

Contributor prefix : gav

Objects
gav / Rot Enc / Rotary Encoder Basic.axo
Rotary Encoder Basic.axo (1.1 KB)

This object is designed to provide incremental and decremental value depending on the direction being turned on the rotary encoder.

For more info on Rotary Encoders, please review the User Guide Entry "Rotary Encoders"

Thanks.


#2

Objects
Chainable demux for unlimited Demux length.
gav / Demux / Chainable Demux.axo
Chainable Demux.axo (1.6 KB)

A demux that can be chained to another for unlimited length and configuration.

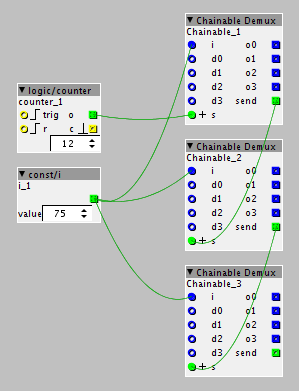
How one may go about chaining the objects as follows..

just connect outlet send to inlet s on the next Chainable Demux object in your chain.
The inlet outlet numbers remain the same, so please do your own math to determine where it is at, so in the example shown value of 8 initiates outlet o3 in the second chained object. All the inlets can be from the same source as shown, or if you like, it can have variations of different sources or multiple sources if the objects are paired in parallel etc..

Thanks.


#3

Objects

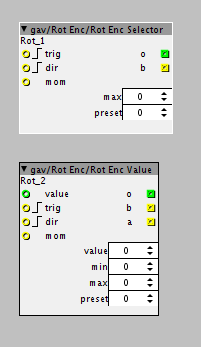
Both objects are designed to work together so all parameters can be controlled by only 2 Rotary Encoders. Each Rotary encoder is connected to 3 digital In GPIO pins on the Axoloti.

gav / Rot Enc / Rot Enc Selector.axo
Rot Enc Selector.axo (1.6 KB)

gav / Rot Enc / Rot Enc Value.axo
Rot Enc Value.axo (1.9 KB)

Both objects are similar in design, they both have an adjustable maximum parameter, and a preset parameter which will be the integer where it begins once started.
The "Rot Enc Value" object also has a minimum parameter and a value parameter.
The "Value" parameter is the unique number given to activate the object when the selector selects its value. eg.. "Selector" object selects value 5, any "Value" object containing the value 5 in its value parameter will become active and can be adjusted by twisting the rotary encoder for increment or decrement, or pressing the momentary switch option (if it has one). outlet_o - is the rotary encoder integer for connecting to the objects you are adjusting, outlet_b - is the momentary switch in boolean, outlet_a - is a boolean output that goes high when the selector and the value match to confirm that object is connected to the selector.

To add more parameters, just increase the max value on the selector and add more "Rot Enc Value" objects.

The following patch shows a basic setup spread out over 0 to 15 selector values with 4 Value objects spread out amongst them.

rot enc.axp (8.1 KB)
All in working order.


#4

Following is a video of the 2 rotary encoders to control them all in action.


#5

All the above contributions are now available in the community library.
Enjoy.
:grin:


#6

New Object
gav/Audio/Object Swap.axo

This object is designed to swap the order of 2 connected objects.
This way you can choose between 2 options for audio path order, 1 to 2 or 2 to 1.

Connect one object to in1 / out1, the other to in2 / out2, as per the image below.
Toggle "off" passes audio first through object 1 then object 2 then main out,
Toggle "on" passes audio first through object 2 then object 1 then main out,

Image below of how to use.


#7

New Object
gav/Diode Clipping/Diode Clipping simulator one.axo

This object is designed to emulate the effect diodes have in effect pedals to make the audio clip.

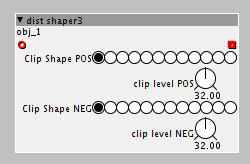
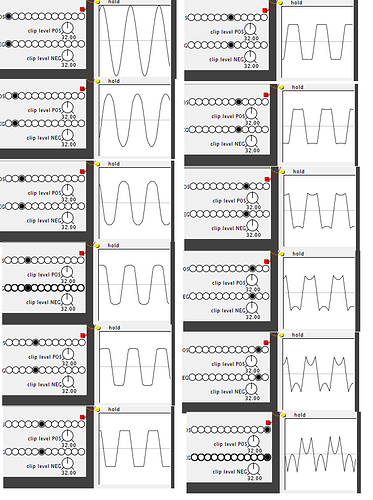
The object controls seperately both halves of the signal, this allowing for asymetric configurations if desired. Clip level sets the voltage level (represented as 0 to 64, reverse for negative half of signal) at which the signal will clip. The 12 radio buttons determine the shape of the clip, ranging from soft to hard. However an added feature is the first 6 radio 1 to 6 buttons go from soft to hard, whereas the radio buttons 7 to 12 become reverse of 1 to 6.

Below is a set of images that best show how the radio buttons work, these signals come from a generic setup using a clasic sign wave with the clip level set to the middle 32 and equaly copied for the negative half to best represent the setup.

One thing to remember is the clipping level, you may need to add gain to your signal to reach your desired clipping level.
And would also like to recomend that I have achieved some nice results by connecting the following object..
jho/filter/notch
:grin:


Starting points for guitarists
#8

Hi @Gavin, Thanks for all your great object, I must say that your Rotary encoder objects are really useful on my new build (I put two rotary encoders and a OLED screen). But I seem to have a small bug on the "Rot Enc Value" object. I doesn't output negative numbers, even if you can set the minimum to minus whatever. Is this intentional (I can do with it, by adding a -c object) or is it a bug alike.

Thanks anyway, and hope you are well :slight_smile:


#9

Interesting.. !
To be honest the way I understand the rotary encoder code I posted, is it detects the direction it is being turned and based on weather it is in high or low state on the rising edge it increments or decrements by what is defined in the code. In the example I posted by ones. So the upper limit and the lower limit are irrelevant.
Or my testing was based on midi 0 to 127, so I coded it to stay within this area, now that I think about while typing this, I wonder if the integers I used were only unsigned, rather then signed, that might be preventing negatives, but that's just a guess.

So wouldn't say as such it is a bug, but code in its most simplest form so all could add their own features, adding an extra object to achieve the desired outcome is the same thing, doing this is practically the same as just adding an extra line of code.

If I understand correctly from other posts, you don't do much coding, if you can achieve the same result without, by only using objects, then you don't need it. Sometimes however it can help achieve some benefits in efficiencies and the likes etc.. This is another cool feature of the patcher that Johannes has achieved, its very much just a visual programming tool.
:grin:


#10

Got me deciding to do something, I have thought about for a while. Many times when I am posting, I am far from my Axo. So I have wondered for some time about using the HTML object list online with copy and paste.
So let me try it for this...

You should be able to create a group of object for controlling a rotary controller with the following setup.

The direction will be determined by 0 or 1 on the demux, as the trigger is triggered, it will take the relevant path depending on wether it is high or low determining the direction.


#11

Thanks for your answer. I tried to patch your simple patch, having understood very well with your explanation (and using that html object list works well). But for some reason it doesn't really work (I'll have to look into this a lot more), but your objects do, and so do other rotary objects in the community library.

You're right about the coding, and I really need to seriously work on this aspect. I've started looking more and more into peoples codes, sometimes managing to adjust it to my needs, but I'm still months of heavy learning away, just to feel comfy to code simple logic stuff. (I don't ever expect to understand DSP code in this lifetime)
That's what I like about the visual side of Axoloti, I feel like a programmer, but I'm not dealing with code.
It's only now, while patching for 2 rotary encoders and the OLED screen, that I'm realizing the mess a simple patch can become if you want to control everything using just the two encoders and have visual feedback.

Anyway thanks again for your help.


#12

@mtyas, This might help you.

Object - gav/rot_enc/Rotary Encoder Bipolar.axo
This rotary encoder is the same as the "gav / Rot Enc / Rot Enc Selector.axo" object except for the "max" value represents both negative and possitive limits.
So if for example you choose 64 as your max value, positive 64 will be your highest level and at the same time negative 64 will be your lowest level.
I won't post a picture because it looks exactly the same as "gav / Rot Enc / Rot Enc Selector.axo" but with different name.


#13

New Object
gav/Logic/Dynamic Counter 1.axo

Dynamic up / down counter.

As each stage count is completed, the next stage count begins in the opposite direction.

numstage - will determine how many stages will be select from stage 1 only to all 8 stages.

retfirst - will return to the very beginning of count 1 in forward direction when the last count of the last selected stage is complete, if not on, then the direction is changed and count continues fromm last point.

restart - will return to the very beginning stage 1 count 1 in forward direction, toggle parameter was added so a midi cc could be nominated.

The purpose of this object is to create length when connected to a sequence so it is percieved a less or even non-repetitive pattern.