Controlling Reverb Mix with Sharp Sensor


#1

Hi, I'm very very very new to Axoloti and I have a quick question on how to make a patch work

We're building a musical "tree-instrument" for a residence in partnership with school for the deaf in Brussels and I've built an entire midi instrument with arduinos and sparkfun cards. On of our collaborators brought an Axoloti and I had a leftover
Sharp GP2YOA21 sensors and I figured that since one of our "tree branches" was going to be a snare pad and that
our concept was to interact with the tree, it might be interesting to be able to trigger some effects with the Sharp sensors

I'm also realizing having never worked with Axoloti, getting the object to work in under 5 days might be a little over my head.

Patching effects after an audio in is quite easy at this point, and getting the Sharp to work through a digital input is working when trying to control the timbre or pitch of an osc for testing, but I can't seem to figure out how to control an effect mix.

Someone in another post suggested using a mod source object and modulating the mix button of the reverb/ effect but somehow I can't get it to work

If anyone could help me figure that one out it would be very much appreciated (if not, we'll go sans fx, still cool but a little less cool!)

sorry if this is really noob stuff, I totally want to dwelve into programming this amazing thing but am really running out of time for this one!

Cheers


#2

to get the mod source working you have to click on the object next to the parameter you want to make the mod source. you'll see the slider menu appear. it's a little tricky because you can't see it on the object itself until it's enabled. same with midi channel, which can be confusing because those menus are right on top of each other.

if the mod source still doesn't work after that, open said midi menu, pick a channel, choose any channel, create a midi/intern/cc object, set the object to the midi cc chosen on the parameter (channel should be 1 by default), hook the external input into the midi/intern/cc object, give it a whirl.


#3

Not trying to critisize or be negative, it's great that you do this, but I got a bit confused when I read "school for the deaf" and having a "snare pad".. I'm curious, if it's a school for the deaf, isn't an audio-based thing a bit weird to do? Is it so they can make music for others that cán hear it? (or perhaps some are just partly deaf and still can hear parts of it..) Or does it also controls lights so there's also a visual performance for the people that can't hear it? Or do you even have something that they can use to actually féél the music by touch?
Or perhaps I'm reading this completely wrong and you're building this thing WITH this school for a residence where (also) hearing-people live?
If you're making this for use by deaf people, I'm very curious to know what you are using to enable them to "hear" the music.

To come to you question:
-you write that you've used a digital input (which is a "bit-sized" boolean input used as either a 0 or a 1 for off/on). Have you tried using an analogue-input module? As far as I know, the sharp sensor I used like 10 years ago had an output that maxed out around max 3.3V (please check this before connecting it to axoloti, or it might fry the board if it goes over this!) and as it's an analogue distance sensor will return a value between (as far as I remember, I can be wrong about this!) minimum 0.7V and maximum 3.3V, so you should be able to do a continuous control with this. To scale this to a "normal" fractioned 0-64 range (like the normal knobs):
-read out the maximum and minimum output of the sensor how it is received inside the patcher using a display module.
-subtract the maximum value from the minimum value to know the control range/width of the sensor
-use a "reciprocal" module and send this range value to the input (this will calculate 64/range)
-then subtract the minimum value from the incoming sensor signal to set its lowest point back to zero.
-then multiply this outcome with the outcome of the reciprocal module.
-the output of the multiplier will now be (around) 0 to 64. To make sure it won't go below 0 or above 64, you can use a unipolar saturate module (math-tab "satp").

This value can now be used to control all kinds of things with easy scaling of the range.
If the value still "wobbles" or is noisy, use a lowpass filter module fom the kfilter tab (control-rate filter) to smooth out the signal. You can also use my glide module (sss/math) which also gives you the option of linear-rate (signals change by a fixed rate, small distances take little time, bigger distances take longer time) or linear time (each change, no matter how big, will always take a certain time, though this might not work well if the input keeps changing all the time)

To use this as a mix-control for a reverb, you don't necessarily have to use the mix-control on the reverb itself, you can also use a post crossfade after the reverb and mix it with the original input. The crossfaders are at the bottom of the mixer-tab and have a pin input to do the crossfade for you to connect the scaled sensor signal to.

#4

Also check out the "fx/lmnts/reverb" object. Sounds good and has an inlet called "amount" for dry/wet control.


#5

Thank you!! I'll go through the technical part of your response this afternoon!

As for the project in itself, this is a collaboration with the school, the students there were asked to draw images of trees which we used as inspiration for a sculpture that should be interactive both visually and produce sounds. After our first residence we designed a tree trunk that ressembles some of the drawings. The trunk is made of a metal frame with a ground metal plate and several "branches" which are metal tubes screwed into the trunk frame. One of the resident has made a tree bark out of resin and sillicon that covers the main metal frame. The initial idea of the project was to use piezos etc all over the branches and modulate their sounds via ableton. I was included at this stage on the project and decided to revise this idea and turn the end of the branches into drum pads going into an arduino going out to a midi port as I figured it'd be much easier to control what comes out sonically than with piezos on a vibrating metal frame, and also because the musical content might need to be adapted for another similar residency later in april (which in this case would be a concert by the musicians working on this project playing their songs to an audience of deaf students and their parents). The idea of going with midi also comes from the same conclusion that you had in your post which is that it's very unlikely that a piezo might produce something controllable within the range of the perception of the audience. Using midi allows use to control various devices that can produce sub frequences. The P.A for this project has included a sub monitor that will be facing the audience and its placement in the room was chosen to reinforce the room modes in order to maximize the sub response at the center of the room. We figured when we were researching that it might not be a good idea to give a direct tactile access to the students with the tree as some of them are suffering other impairments that prevent them from moving or accessing the tree so we decided to rely on sound and visuals. This residency will include two songs performed by the band with the tree instruments with a french-belgian sign language interpretation included in the choreography (which will also include the motion sensor, which will be taped to the trunk and used to either add reverb or change the decay of the subs), a video of the sign language interpreter will be projected and synced with the songs, and the tree an classroom will be decorated with dry flowers and other things with the help of some of the students. The initial idea of the project also included that leds would be controlled with the pad hits in order to add to the visual performance, however the idea was dropped as one of our collaborators had to leave the project as his main job is very impacted by the increase of the price of wood because of the war in Ukraine. I was mostly hired as a musical director and arranger on the project so I can deal with basic arduino projects and midi etc. but I've never made a project involving leds or dmx and decided that learning how to make light work with all of these with our time constraint was a bad idea and decided we'd have a separate lighting system that isn't reactive to the object but can be controlled. If the construction goes fast enough i'll be looking into triggering videos with ableton via midi with the projector but so far that's where I'm at.

Thanks a lot for your response by the way, I'll be looking through all of that over the weekend and see if I can make all of that work! The residency will be filmed as well so i'll be sure to post a link if you're interested in the result


#6

That sounds like a great project! I hope you don't struggle too much with the time constraints. For triggering (and radically deforming) video via MIDI you could also look into "Aestesis Elektronika", it's old, but free and pretty cool.


#7

Thank you!! I'll look into it!


#8

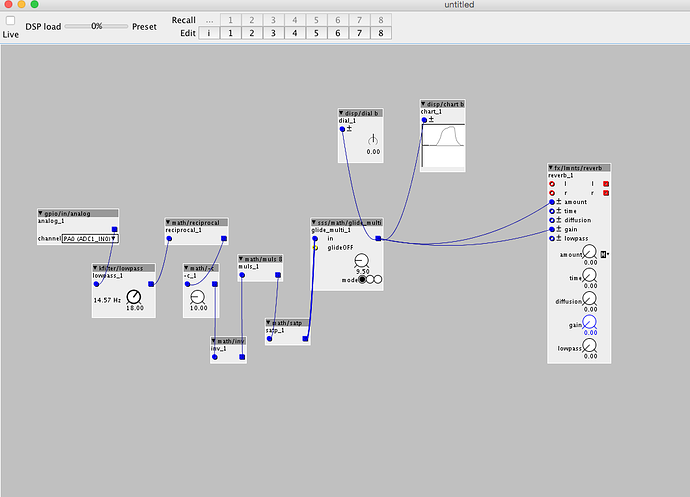
Ok this seems to work great so far, thank you so much! The glide effect really helped to smooth it out!
I can now control the dial with the sensor (I had to invert the signal because the sensor outputs its max value when its at rest and decreases it when detecting motion).

(EDIT, the verb know follows the sensor input now, thanks to everone! I've used midi/intern/cc thin instead of the source mods which I had troubles making work)

The only thing I haven't been able to figure out (which might be the easiest)
is to modulate the crossfade / parameter of the reverb, the dial function and goes from 0-64 but when I connect the same out to any parameter it doesn't change (I've also tried to send the out to a source mod and assign that source mod to a button but it still doesn't move it) I might be doing it wrong but I feel like i'm almost there! (Edit: It works when controlling the pitch of an osc, but no other buttons) I have included a photo of the patch just in case


#9

if you attach a cable to an inlet, this is often added to the parameter value (or in some cases the knob sets a modulation with of the inlet, eg. fm-width), so the knob itself won't change when the input changes. You can just use it as an offset.
If you use the inlets, you also don't need to use the mod-source or midi control on the respective knob (only if you really want to control those with actually available mod-source (which I don't see in your patch) or midi).

Just connect some audio input to this and an audio output to try out the module, you're almost there!
For quick testing, just add a button and an edrum and connect the reverb to an audio out.


#10

So! After the first full test, the control via the sensor seems to be working and stall but I ran into an issue:
The sensor is adding noise to the signal which can be heard on the audio out. I've just read that this is a common issue on this Sharp Sensor (I've added some filter caps on the sensor but the noise didn't drastically diminish). I figured I can either reallllly filter the signal and use it as a sub decay controller but I also thought it might be interesting to only use the Axo as a midi controller for this residency and maybe use it to controller hardware effects via midi. I guess my question is, are internal cc automatically transmitted via the midi out?


#11

in the midi-out folder there are midi modules in which you can select whether to send the midi internally (inside the patch), over usb-host (connected computer), usb-device (the bigger usb-B connection for usb-midi-controllers) or over the hardware DIN output.
So you can use these modules next to each other to send out the midi over 16 channels over each of these midi outputs independently (each output can support 16 midichannels on it's own and won't interfere with the others).