Before I cut off the MIDI board


#1

Is there anything I need to do or consider? My last board got fried after I removed the MIDI board (pre soldering anything, so it might have happened due to soldering) even though I followed the 'perforated line' between the main board and the Midi board, so now that I've got the entire board wired up and working I'm terrified of it happening again. It needs to go because of the enclosure size.

Side question, can I somehow install a normal DC input after I remove the MIDI board, and if so... Give me the deets pls! USB is fine for home use, but if I want it on my board I'd prefer just having it run on a normal DC barrel.

Thanks in advance!


#2

For cuttingg off, i think the biggest danger lies in accidentally connecting the several layers of the PCB while sawing. so maybe just double check the cutting edge afterwards with a maggnifier and if needed sand it off a littlebit? i think most everybody is fine, maybe yu just had really bad luck last time. iirc people reported using a proxon/dremel w very good results.

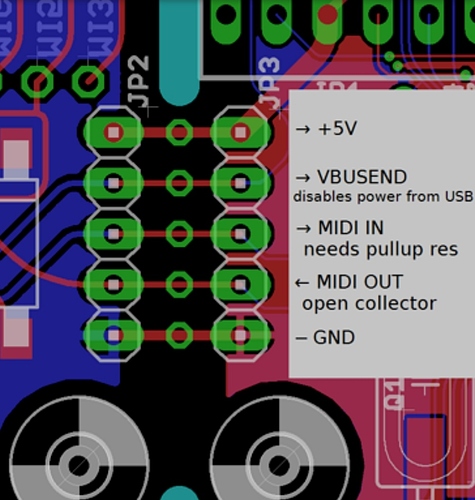
for DC input afterwards, you would either need to set up your own DC/DC circuit to get from 9v to the axoloti 3.3/5v, or, recommended, you reuse the cut off midi part for its poweer converter and reconnect the 5x pin header at the cutting edge. if you need the space you can consider unsoldering the midi din jacks from the cut off part. but that part also contains the voltage converters/regulators etc.


#3

Thank you!

So I can theoretically just use the JP2 +5V and GND connections to attach a normal DC input plug?


#4

if you have a well regulated 5v source then yes you should be able to just use these pins directly. what i was recommending is re-using the cut off part, in a more convenient location, connecting those 5 jumpers and using the original axoloti dc-dc converter instead.


#5

Ah, I see. I will have to see how much room is left after I've crammed everything in there. Thank you again for all the help!