I don't really know very much at all. I was thinking I would try something simple to start. some -5 to 5 volts would be ideal for needs. many eurorack modules clip after five volts and can't tolerate anything over 10. 5 volts is pretty common to open a gate these days. how much harder would it be to make a circuit that didn't just amplify but added negative offset to get that -5 to 5 voltage?
Official pin out/ports documentation
Reading back my previous post sounded maybe a bit inpolite, sorry about that!
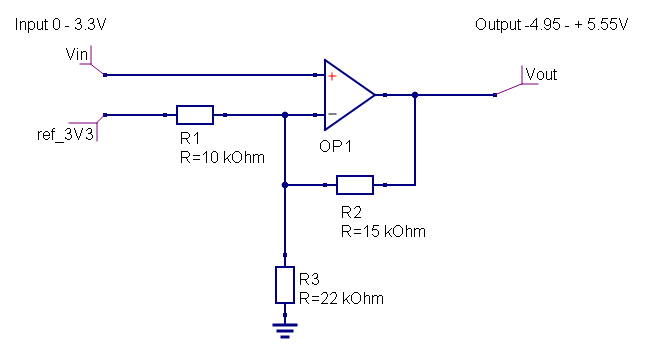
Yes, you can add an offset voltage quite easily. Here is an example that doesn't give exactly 5V, but close enough using standard resistor values:

The 3.3V reference is from the axoloti, and Vin also comes from an axoloti output. The opamp should be powered from eurorack +12V and -12V, such that it can provide positive and negative output. Almost any opamp can be used, for example TL07x or LM358/LM324 are cheap and good enough.
awesome! I am 100% new to circuitry and have only been able to understand and read circuit diagrams for about the last week. so a big thanks to the axoloti community and Johnannes for helping to push me out of my comfort zone. I have those specific resistors on the way plus just a general pack of about 10 different common resistors, I think I should have the values on that diagram and will definitely give your circuit a go once my breadboard gets here. as far as OP amps go i've got some tl072s on the way! @kassu thanks for tyhe diagram soooo helpful... if you've got a chance and could do one for the other way to go from eurorack to axoloti that would be amazing, there is a diagram over on the euxoloti thread however I got confused with there being two different diagrams and unclear labeling of the value of the resistors. I figured I'd start going out as it seems less risky of damaging anything than going into the axoloti from eurorack.
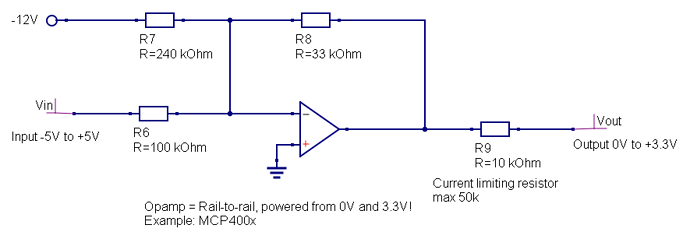
There are several ways to do the input, indeed one has to be careful to protect the axoloti from damage. The euxoloti design uses external ADCs as extra protection (they are cheaper to replace than the axoloti), but the analog circuit from there can be used also directly. Here is a slightly modified version:
I changed it to use the -12V reference voltage from eurorack. It has the transfer function:
Vout = - (33/100)Vin + (33/240)12V
Note that it is inverting! But that is easy to correct in the axoloti patch.
Important point is that it relies on the opamp to clip the voltage to 0-3.3V, and it needs a special "rail-to-rail" opamp which is powered from 0V and 3.3V. To use TL072 a different circuit is needed, maybe I get around to posting an idea later.
I added R9 to limit the current that can flow into/out of the axoloti pin in case something goes wrong with the voltage clipping. This then uses the internal protection diodes of the axoloti chip. The datasheet says you can put 50kOhm max without reducing the accuracy.
Thank you! I can't seem to find the Mcp400x I saw some Ada op amps that were rail to rail but I have no idea about appropriate frequency and slew and all that. Perhaps you could suggest another? What do you think about diodes? Does axoloti have some on the board? I have seen diodes used pretty frequently in a circuit for the ns1 like this http://www.sound-machines.it/product/ns1nanobridge/ in fact I wonder if plugging in the axolotis 3.3v and ground instead of the ns1 5v and ground would make it usable with the axoloti. I wish I could find a circuit diagram for that I have a feeling it make be using a circuit similar to yours. If this could be used with axoloti that would be awesome. If not I will be working on making my own. First on a breadboard. This is super exciting for me. I'm also planning on trying to breadboard a simple lfo with some of the parts I got coming.
@johannes unfortunately I don't know much about digital signals, I was wondering if the i2c outputs on the axoloti are similar to arduino. Was thinking this might be a good way to add more dacs as needed https://www.adafruit.com/products/935?gclid=CjwKEAiAiZK1BRD509nPsYiUk2YSJAAMoAwCAL2XcLToE2s_WH77lbc5kC5uReN1xFtktsqBgvhbRRoCR77w_wcB
It seems like it would be simple enough to use this if i2c on axoloti is similar to arduino
FWIW, MCP600x can be had at mouser etc.
Diode clamps are an alternative; and they're occasionally used, even (for instance, as seen in the 4ms SMR (schematic (scroll down to the "band" inputs/sheet 3).) Generally speaking, op amps are preferred, because lower impedance source = better ADC performance. That said, the diode way is probably easier to implement and chances are you won't do any fancy-pancy sampling.
Re op amps: Assuming you power everything off the axoloti, you won't have a negative supply, so the above circuit won't work (the current limiting resistor isn't needed either; certainly I wouldn't use 10k, which kind of defeats the purpose). You'll need to bias your op amp differently. See figure 4 in here, for example.
I have been considering installing the axoloti in my eurorack case which has a 4 ms 30 row power which provides -12, 12 and 5 volts. I have been having trouble finding rail to rail op amps hence the need to use a negative voltage. I could not find the MCP600x at mouser... then I took the x off and found a whole bunch, any suggestions on which would be best for my applications? being able to run everything off of axoloti's power would be cool for some applications, like bringing it out to interface with friends euroracks without having to bring my skiff, however right now its not a high priority. As far as quality for going in I will mostly be using the ins for gates, triggers and cv. voltage per/oct tracking would be awesome but I won't need to implement it until somewhat later down the line of my build.
Sorry, yeah, by MCP600x I meant MCP6001/2/4. They mainly just differ in how many op amps per IC there are, so it depends on how many CV inputs you want/need.
And in that case ( = power from +/-12V), why not do it as per the "euxoloti" schematic? That's basically how most digital modules do it, I suppose, in the wake of Mutable Instruments. (Though there's no harm in using a TL072 and clamping diodes; it's mostly just more parts.) Either way, I wouldn't recommend relying on the power rails as a reference/offset voltage, ie don't ditch the LM4040.
Note about the euxoloti schematic: It seems to me the opamp is powerd from 3.3V and ground there, just like in my schematic above. It works (I assume, haven't tested it myself) because for MCP6001/2/4 the input common mode range can go a bit below the negative rail (and for the inverting configuration, both inputs should be very close to 0V all the time). The output can then swing from 0V to 3.3V, and this is the main clipping used. Note that when the opamp output clips, the input is no longer at 0V and it will go out of spec; I don't know what happens with this particular opamp in that case. The 10k resistor is optional indeed, and maybe overkill, but you don't need low impedance in this case (the STM32F4 datasheet says 50k is acceptable at the highest ADC speed).
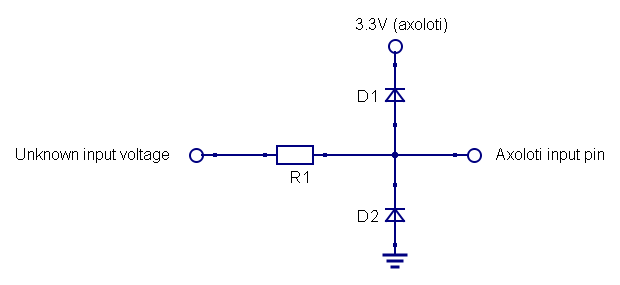
@Illuminate: To use clipping diodes, the general idea is this:

The diodes clip any voltage above 3.3V+x or below 0V-x, where x is the "diode drop" voltage, x=0.6V for standard (silicon) diodes. It is important to have some resistor R1 to limit the current through the diodes, otherwise you just blow up the diodes and you still have no protection. I again recommend at least 10k in this application (and at most 50k), it is high but at least it limits any substantial current injection into the axoloti power rails, which could be harmful. I would also recommend Schottky diodes, that have a lower voltage drop, the limit for axoloti is 0.3V if I remember correctly. An example of a Schottky diode is 1N5818.
The clipping above doesnt do scaling, only clipping so the input range is 0-3.3V. If you add a resistor from the axoloti pin to ground, it becomes a voltage divider, so you can scale down voltages, but still only positive ones. You would get about 0 - 4.8V range with R1=10k and 22k to ground. You can also make it work with negative inputs by adding 6.8k to the 3.3V rails (and keep the 22k to ground), which gives -4.8 to +4.8 V (not exactly symmetric) input range. But it has the downside that you get some nonzero reading when there is nothing plugged in. To fix that, you need an opamp.
Final note: you can use an opamp such as TL072 connected to the eurorack +/- 12V supplies, but then you need to do the clipping seperately, for example with the Schottky diodes. And then you definitely need the series resistor!
Note about the euxoloti schematic: It seems to me the opamp is powerd from 3.3V and ground there, just like in my schematic above. It works (I assume, haven't tested it myself) because for MCP6001/2/4 the input common mode range can go a bit below the negative rail (and for the inverting configuration, both inputs should be very close to 0V all the time)
Sure, my comment was re the negative reference, not power supplies. As to what happens ... I don't know. But I take it they can't be very prone to latching-up, given there must be hundreds of modules built like that on the market and no complaints.
A diode clamp like on the ns1nanobridge, can protect the inputs of the Axoloti Core more or less, if it is using schottky diodes, it can work when connecting axoloti's 3.3V VDD to ns1nanobridge +5V.
However I think the ns1nanobridge is not a very good design because:
* it does not clamp positive voltages if +5V is left unconnected
* clamping the negative side with a 1k resistor in series will affect the output signal (from the module driving it), not really a problem if it is the only thing connected to an output, but when using stackable cables or passive multis to split that output, it will introduce distortion on the CV signal received by other modules.
* if it is clamping input voltage on the positive side, it injects the current into the +5V supply. The addition of a shunt regulator would have been a good idea.
* it uses the same circuit for both in- and outputs, while it'd be better with a 10k resistor on the input, but a 1k resistor on the output.
I2C on Axoloti is similar to arduino. The MCP4725 DAC breakout you suggest can be interfaced with some custom code. Search on this forum for I2C and you'll find some code examples.
For adding eurorack CV in- and outputs, MAX11300 looks like an interesting chip, serving 20 channels with any combination of +-10V CV in, +-10V CV out, gate in, gate out. The MAX11300PMB breakout is not terribly expensive, looks like you can feed it +-10V regulated from +-12V eurorack supply, or perhaps even +-12V eurorack supply directly. Axoloti has SPI available on the GPIO's to talk to this chip, however it requires coding a custom object to handle the protocol.
This looks like an excellent options. If someone writes the code for the custom object I would definitely be interested in trying it out. Otherwise it may need to wait till/if I learn sufficient coding to accomplish that task. Thanks for your replies. I am going to start working on cv out from the axoloti soon. I will start a seperate thread to keep you all posted on my progress.
@johannes I was wondering about the + and - symbols on the audio in and out. I'm not sure what those mean, is it positive and negative phase shift for balanced outs?
Yes, those connect to the audio converter balanced input- and outputs. Keep in mind they're biased at 1.65V at that point. (The balanced output solder pads were added on board revision 1.1)
To anyone wanting to make a similar non inverting op amp as describe above for 0-5v output there was some noise driving the op amp towards the positive rail for very short time that I could not detect with my multimeter however it was there non the less close to 10v for a few milliseconds every time the gate was triggered. Caps placed between positive and ground as well as negative and ground fixed this problem. Also without the 100k resistor across the input the op amp was driving towards the negative rail when there was no input.
The balanced output solder pads were added on board revision 1.1
Is this 1.1 schematic already up somewhere? The main page still links to 1.0?
http://www.axoloti.com/wp-content/uploads/2013/12/axoloti-core-sch-v10.pdf
Working on getting some input
Going... I'm really confused about this transfer function to me it looks like it's just going to clip the op amp towards the rails all the time... Like with 0v in we get (240/33)12= 87.27 as v out. 1 v in = 83.97 out. I haven't ordered mcp6004 yet but it looks like this would just output the 3.3v the whole time. What am I missing?
I'm really confused about this transfer function
It's V_out = - (R_f/R_in) * V_in. You have it the other way round. It should be: -0.33 * V_in + 0.1375 * 12V.
As mentioned, it's good practice though not to rely on the power rails as a reference/offset voltage.

