Axoloti and sensors


#16

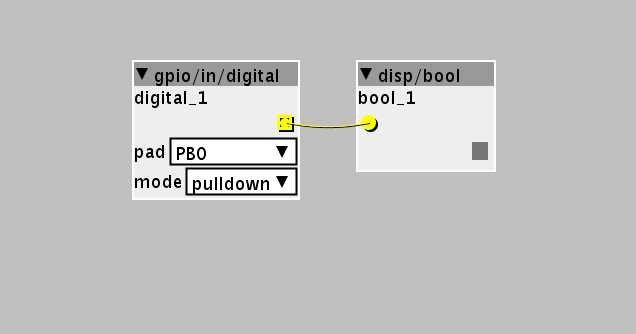
The kscope and scope objects are useful to display waveforms, not to see if a button is pushed. You can use a disp/bool object for this. The mode of the gpio/in/digital object should be set to pulldown.

Circuit connections for this patch:

  • VDD is connected to first leg of the button.
  • PB0 is connected to the second leg of the button.

#17

Ah! thanks!! Apparently I also can't just change the ctr/toggle to a digital in. I can turn it into a ctr/button but still i can't map that to the digitil/in. also tried the convert a to b... sorry to bother with stupid basic questions. but I'll definitely get your book!


#18

exciting stuff here. has anyone tried ultrasonic sensors yet? or PIR motion sensors? is there maybe a list somewhere of compatible sensors?

i see in the book there is some good information on how to patch with the distance sensors, im just wondering about other hardware (voltage etc)


#19

Ultrasonic distance sensors might work, but they will require a script or custom object.

PIR motion sensors may be handy when you use Axoloti as a standalone interactive audio installation, but don't have any value when using it as an instrument, since they only act as a pushbutton when motion is detected.


#20

Hi, I didn't want to start a new thread, so I'm completing this one

I'm wanting to make a new ribbon controlled axoloti, and I was wondering if any of you have ever tried these sensors.

500mm position sensor

600mm pressure sensor

3 axis accelerometer

I'm thinking of mounting the two ribbons, one on the other just like this arduino project

here is a quick sketch of the intrument

Talking about sensors, I'm also thinking about creating a clock from my heart beat. The simplest way I've found (unless someone tells me it wouldn't work), would be using this pulse sensor plugged into an analog Gpio and filtered / converted into a square wave LFO using a simple ">c" object.

Does anyone see anything that could go wrong is the component and simple interfacing (directly into the Gpio's, sometimes with resistors) with the axoloti board ?

Thanks in advance


4 - 5 November 2016 - radical dB showcase - Zaragoza
#21

For the SpectraSymbol position sensing ribbon, check this thread https://sebiik.github.io/community.axoloti.com.backup/t/softpot-ribbon-controller/902/3 it's actually duo-touch if you wire it up the right way.
The Interlink pressure sensor, I belief is a common component in keybeds to sense channel pressure. The Doepfer ribbon is also a stack of the SpectraSymbol ribbon and the Interlink FSR I believe.
The accelerometer looks fine too. In terms of interaction, gyroscopes are more interesting than accelerometers, but that is just my opinion, consider a 3 axis accelerometer + 3 axis gyro sensor module, though it seems those modules do not have analog outputs but need to be interfaced through SPI or I2C.
The pulse sensor, the way they soldered wires to that board (on surface mount pads) looks fragile to me, stress on the wires could easily lift the solder pads from circuit board, so handle with care. Other than that, looks great.


#22

Thanks a lot Johannes, I now understand the double touch trick, very interesting indeed and well more than I expected.
I also saw that the pulse sensor looked a bit fragile, but I can see myself solidifying it as well as attaching the wire to some ear piece so that the weight of it doesn't pull my ear off (I need to keep my hands free).
Anyway, I think October will be a augmented sensor month for me, if I don't waste too much of my time in fire wood cutting (winter is approaching).

Thanks for everything, once again


#23

i used four softpots for my bass-guitar like midi controller. see below... i also wired them in double touch, but only measure the "top" position. that way i can do hammer on and pull offs like on a real bass...


#24

Great project lokki, must be a blast to play
I just received my softpot today, so I'll be testing it, while trying to understand the maths in @johannes demo axoloti patch.
I read about some people that damaged the ribbon by miss wiring it somehow. Does anyone know what I must NOT do ?


#25

it is a blast, i'm still exploring all the possibilities! it's so reactive to touch (the fsr side) just great to modulate sounds. i will post soundsamples at some point, made with the axoloti of course! regarding your question, i did read those comments as well. i think they mostly concern the round softpots (look like a pot) and the standard wiring with ground and v+ on the outer terminals and reading in the middle. if you would press the softpot both in maximum and minimum position, you could create a "short" and the pot would heat up. this will not happen with the wiring i and johannes use.


#26

Hi ... I'm thinking of using the Sharp GP2Y0A60SZ which I can't tell if this is the one you are connecting there. Its specs claim that a range of 10-150 cm .... Are you using a specially tuned object to interpret the signal in the Axoloti patcher? Any further advice on using this analog distance sensor? Thanks for sharing your project


#27

Hi lokki and mtyas,

Lokki, what do tou mean when you say "this will not happen with the wiring i and johannes use".

And mtyas, i saw that you finally finished your ribbon synth. Can you share more information about the final setting (double-touch solution, etc.).

Thank you very much in advance


#28

there are basically two different methods to wire a soft pot to measure position, either you connect 5v and ground to the outer two connectors and measure at the middle point, or you do it this way:

http://www.ooooo.be/devices/ribbon4/ribbon4.htm
look under "better multi touch version" for the wiring.

hope this helps.


#29

I'm using the Sharp GP2Y0A21YK0F sensor, connected to 5V, GND and one of the analog GPIO pads. Sensor has a range of 10 to 80cm.

No need for special objects, but you may want to invert the signal in some cases because it makes more sense for controlling sound.

The sensor you are mentioning will probably work in the same way.


#30

Hi Xoanxil

I actually more or less followed my plans, using two ribbons, one for position and one for pressure.
For the position related ribbon, I wired it up as johannes explained in his post (that lokki linked to two posts up).
So I'm using 2 resistors and two analog gpio's. That way I have a low position and a high position (dual touch)
For the patching and scaling part, I'm having to put two math/exp objects in series to have a usable signal. And I still havn't found a way to tune scale of the two signals (for example if I connect the low and high signal to two different oscillators, they won't be in tune for the whole distance of the ribbon).
So I often use only one signal for the tuning, and the other for something else (cutoff, fm amount...)
I've also put a joystick on my ribbon box, that I use for octave up and down, and pitch bend. When I press down the joystick (it has a built in switch) it send the signal thru a quantizer object (in case I want to play in tune).

A funny thing, is that each time I do a gig somewhere using the ribbon synth, people come and ask me about the dual touch function. So it's quite a "unknown" function, even in the "DIY / synth / geek" community


#31

Thank for your answers,

I have made some trials some time ago with Arduino using only one resistor this way http://www.eerkmans.nl/wp-content/uploads/2014/03/meter_resist.png.

The result was that you get "0" when you dont touch the ribbon. If I dont use the resistor it generate unstable numbers.

Using the "better multi touch version" what will be the behaviour? I am waiting for my Axoloti board so I cannot make trials by myself now.

I have reading the article and it is great although I don´t understand the electronic working completely. I have only basic knowledges about and it is not too clear for me. Can you shed some light...?

Attending to the practical installation How do I have to connect everything?:

Ribbon has three pins, so:

Ribbon GND --------> Axoloti GND
Pin A ----------------> resistor (100k?) -------> ????
Pin B ----------------> resistor (100k?) -------> ????

and then the maths inside Axoloti patcher.

Another questions:

  • What volts conection I have to use, 3.3v or 5v?
  • Do you have some experience about what ressitences values is better to use?

Thanks janvantomme about using Sharp GP2Y0A60SZ too. Yes, it probably works but according the article it is not best way.

#32

Thank you very much mtyas. I am planning the same with two ribbons, possition and pressure.

So it would be something like that:

Ribbon GND --------> Axoloti GND
Pin A ----------------> resistor (100k?) -------> GPIO 1
Pin B ----------------> resistor (100k?) -------> GPIO 2

What resitor values are you using?

And then math inside the Axoloty patcher

Isn´t it?

I am not still understand completly how the conections for sensors works in Axoloty because I have not yet received it but I am anticipaiting the human interface.

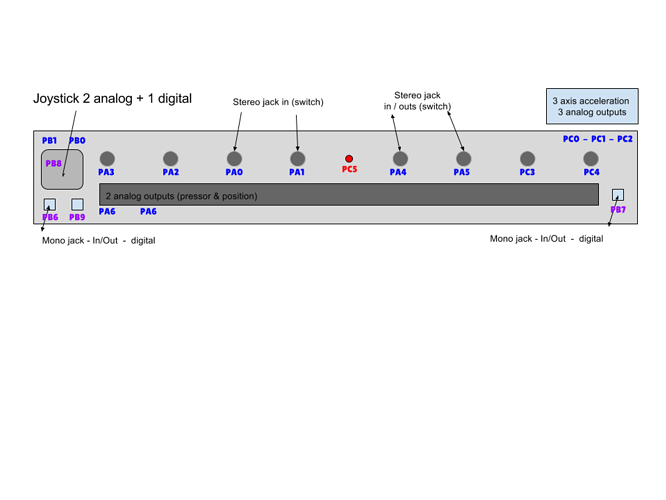
Are there some place where I can find detailed information about all the conections? How many analogue sensors can I conect... I guess I have read someplace 16? Is that rigth?

I am also a bit confused about volt. I can see 5V and 3.3V conection on the board but someplace in the web informacion it said use 3.3V for not damage it. Are there more specific information about this?


#33

I don't think the resistor value is very important [Correction, it is important, see lokki's post], just make sure they are the same. I can't remember what I used, and I can't see inside the box. I think 10k or 100k should be fine.
I used a conductivity meter to find the right pins on the ribbon.

for the circuit, I followed this diagram.


You have pin1 --> ground
pin2 --> resistor and gpio1, resistors other side goes to VDD
pin3 --> resistor and gpio2, resistors other side goes to VDD

For information about inputs and outputs follow these links :
Axoloti in/output overview
General input output examples

For the voltage question, 5V is only used for usb power, just as you can power it by the barrel jack with any supply between 7V and 15V.
But all gpio's only function with 3.3V


Using body as resistor via gpio
#34

the resistors do matter. basically you are creating two voltage dividers, one is formed by r1 and ra and the other by r2 and rb. since you are creating a voltage divider with a fixed resistor you will not get the full scale of the adc reading. so depending on the value of r1 and r2 you will get a different range from the adc. here is the relevant part of johannes document:

What value do we take for R1 and R2 ?

There is no reason to take different values for R1 and R2, that would break symmetry.
The maximal voltage we can find on outA is when the ribbon is actuated at the rightmost position, meaning RA = RT. This voltage should not be too low, since the A/D converter measures the range from 0V (GND) to 5V (VDD) (VDD could also be a different voltage but that does not make any difference) is divided in, say, 1024 steps (for a 10-bit Analog-to-Digital converter). If the maximum voltage on outA is only 5% of VDD, we can measure only 51 different steps. This keeps us from using a very large resistance for R1 and R2.
On the other side, if we take a very small resistance for R1 and R2, half of the voltage travel will occur in a small zone of the ribbon near the terminals.

what resistance is your soft pot? you will have to choose resistors based on that. 100k seems to high.


#35

I understand. My softpot is this:

"the resistance linearly changes from 100Ohms to 10,000Ohms"

Thank you very much for your answers.